
Installing a Direct-Buried Fiber Optic Cable requires precision and attention to detail. It is essential to follow a step-by-step process to ensure the Direct-Buried Fiber Optic Cable remains secure and functional underground. Proper installation safeguards the cable from potential damage caused by ground pressure or freezing temperatures. By prioritizing durability and efficiency, you can establish a dependable connection capable of withstanding various environmental challenges.
Planning and Preparation
Conducting a thorough site survey
Start by surveying the installation site. Walk along the planned route to identify potential obstacles like rocky terrain, underground utilities, or water sources. Use maps and utility records to confirm the absence of buried pipes or cables. Mark these areas clearly to avoid accidental damage during trenching. A detailed site survey helps you plan the safest and most efficient path for the Direct-Buried Fiber Optic Cable.Due to the direct burial in the ground, the depth of burial directly buried fiber optic cable must be a certain distance from the ground. With the help of ground tension, the fiber optic cable will not be damaged, but also to ensure that the fiber optic cable will not be frozen.
Trenching and Cable Placement
Marking and preparing the cable route
Marking the cable route ensures accuracy during installation. Use spray paint, flags, or stakes to outline the path clearly. This step helps you avoid mistakes and keeps the project on track. Pay attention to areas where the cable might cross roads, pipelines, or other utilities. Mark these intersections carefully to prevent damage during trenching. If the route includes curves or turns, make sure the markings reflect the natural flow of the cable. A well-marked route minimizes confusion and ensures the Direct-Buried Fiber Optic Cable follows the planned path.
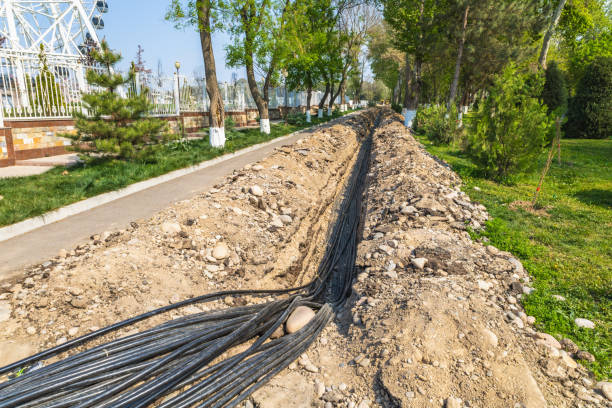
Ensuring proper trench depth and backfill requirements
The trench depth plays a critical role in protecting the cable. Dig trenches deep enough to keep the cable safe from surface pressure and freezing temperatures. A depth of at least 24 inches is often recommended, but check local regulations for specific requirements. Clear the trench bottom of rocks, hard soil, or debris. If the ground is rocky, add a 4-inch layer of fine soil or sand to cushion the cable. After placing the cable, backfill the trench with 12 inches of fine soil or sand as a protective layer. Avoid mixing rocks or hard materials into the backfill. Compact the soil gently to secure the cable without causing damage.The cleaning and backfilling of the fiber optic cable trench The bottom of the trench should be level and free of debris such as gravel and hard soil pieces, which will hinder the laying of the fiber optic cable. If the trench is stone or half-stone, the bottom of the trench should also be paved with 10cm thick fine soil or sand and plowed flat. After laying the fiber optic cable, should be backfilled 30cm thick fine soil or sand as a protective layer, is strictly prohibited gravel, bricks, hard soil mixed into the protective layer. The protective layer should be gently flattened by artificial method.
Cable Laying and Splicing
Handling cables to avoid damage
When laying a Direct-Buried Fiber Optic Cable, handle it with care to prevent damage. Avoid dragging the cable across rough surfaces or sharp edges, as this can compromise its protective sheath. Use cable rollers or guides to support the cable during installation. If you need to move the cable manually, lift it gently instead of pulling or yanking. Always inspect the cable for visible damage before and after placement. Proper handling ensures the cable remains intact and functional throughout its lifespan.Fiber optic cable laying the same ditch laying fiber optic cable or cable, should be towed at the same time laying. If laying with direct burial cable ditch, should be laid first cable, and then laying fiber optic cable, and parallel arrangement in the bottom of the ditch. If the ditch laying fiber optic cable, should be arranged separately at the same time, the bottom of the ditch shall not cross or overlap. Fiber optic cable should be placed flat on the bottom of the trench or natural bending to release the stress of the cable, if there is bending or arching, it should be placed as flat as possible, but it should never be used in a forceful way such as stepping on the foot.
Maintaining minimum bending radius and pulling strength
Fiber optic cables have specific bending radius and pulling strength limits. Exceeding these limits can damage the internal fibers, leading to signal loss or failure. Check the manufacturer's guidelines for the minimum bending radius and ensure the cable follows a natural curve during installation. Avoid sharp bends or kinks, especially at corners or intersections. When pulling the cable, use a tension gauge to monitor the force applied. Keep the pulling tension within the recommended range to protect the cable's integrity. Following these precautions helps maintain the performance of your fiber optic connection.
Splicing techniques for secure connections
Splicing is a critical step in connecting fiber optic cables. Use a fusion splicer for precise and reliable connections. Begin by cleaning the fiber ends to remove dirt or debris. Align the fibers carefully in the splicer to ensure a seamless connection. After splicing, protect the joint with a heat-shrink sleeve or splice enclosure. Label the splice points for easy identification during future maintenance. Proper splicing techniques minimize signal loss and ensure a stable connection.
Documenting results for future reference
Marking The joints, turning points, reserved lengths or intersections with other pipes of directly buried fiber optic cables should be marked for future maintenance. Marking can be done not only by using a special sign, but also by using a permanent building near the fiber optic cable to measure the distance between a part of the building and the fiber optic cable, and record it for examination.